Customize your instance
This section contains instruction to customize your RDP registry.
Allowed email providers (new in 1.5.8)
You may restrict which email providers can be used for creating new accounts by specifying a list or a file containing allowed domains. Matches are performed in a case-insensitive manner. Only printable ASCII characters are allowed.
rdp.settings.allowed-email-domains=example.com
rdp.settings.allowed-email-domains-file=file:swot.txt
rdp.settings.allowed-email-domains-file-refresh-delay=3600
The default refresh delay is set to one hour. Disable it by setting it to an empty value. A value of 0 will cause a
refresh on every validation.
This feature is disabled by default.
Internationalized domain names
To use internationalized domain names in email addresses, add their Punycode to the list or file and set the following setting:
rdp.settings.allow-internationalized-email-domains=true
For example, to allow users from universität.example.com to register, add xn--universitt-y5a.example.com to the
file.
reCAPTCHA (new in 1.5.8)
RDP supports reCAPTCHA v2 to mitigate the registration of accounts by bots. To enable it, add the reCAPTCHA token and secret to your configuration.
rdp.site.recaptcha-token=mytoken
rdp.site.recaptcha-secret=mysecret
This feature is disabled by default.
Cached data
Most of the data used by the application is retrieved remotely at startup and subsequently updated on a monthly basis.
To prevent data from being loaded on startup and/or recurrently, set the following parameter in
the application.properties file:
rdp.settings.cache.enabled=false
You should deploy your RDP instance at least once to have initial data before setting this property and whenever you update the software.
The following sections will cover in details individual data sources that can be imported in your registry.
Gene information and GO terms
By default, RDP will retrieve the latest gene information from NCBI, and GO terms from Ontobee. Users genes and GO terms will be updated after a successful update.
Gene information are obtained from NCBI Gene FTP server with URLs stored in the database. You can retrieve these with the following query:
select taxon_id, scientific_name, gene_url
from taxon;
For example, the gene_url column for Homo sapiens would
contain ftp://ftp.ncbi.nlm.nih.gov/gene/DATA/GENE_INFO/Mammalia/Homo_sapiens.gene_info.gz
Genes' GO term annotations are also obtained from NCBI:
rdp.settings.cache.annotation-file=ftp://ftp.ncbi.nlm.nih.gov/gene/DATA/gene2go.gz
GO terms, on the other hand, are obtained from Ontobee:
rdp.settings.cache.term-file=http://purl.obolibrary.org/obo/go.obo
gene2go associations will only be populated for active taxa (new in 1.5.8).
Gene Tiers
Users' genes are categorized in tiers based on their familiarity and experience with the gene. This is explained in detail in the users' documentation and FAQs. Users add TIER1 and TIER2 genes directly, while TIER3 genes are inferred from GO term associations.
To enable only TIER1 and TIER2, and thus disabling GO terms-related features, add the following to your configuration:
rdp.settings.enabled-tiers=TIER1,TIER2
Taxon
The taxon table is pre-populated during the very first installation of the software, at which time only Human taxon is
activated. To enable other taxon, set their active column to 1 in the database.
For example, the following will activate the mouse taxon:
update taxon
set active = 1
where taxon_id = 10090;
Every time new model systems are added to the application, they will have to be activated in this manner.
GO term recommendation
Users can receive recommended terms based on the TIER1 and TIER2 genes they have added to their profiles.
The recommendation algorithm works as follows:
- Retrieve GO terms associated to all TIER1 and TIER2 genes
- Retrieve all the descendants of these terms
- For each term, compute how many TIER1 or TIER2 genes they are associated either directly or indirectly via their descendants
- Keep terms that are not already on the user profile and that mention at least 2 TIER1 or TIER2 genes
- Exclude terms with more than 50 associated genes
- Retain terms that have at least one novel gene that is not on the user's profile
- Retain most specific terms if a given term and its descendant is recommended
You can adjust the number of overlapping TIER1 or TIER2 genes and the maximum size of a GO term by setting the following:
rdp.settings.go-term-min-overlap=2 # new in 1.5.8
rdp.settings.go-term-size-limit=50
Customizing taxon appearance (new in 1.5.5)
By default, taxon are rendered using the common name in title case. The only exception is for Homo sapiens which
renders as "Human / Other". You may override this by setting the following entries in the messages.properties file,
replacing {taxonId} by the taxon ID of your choice:
rdp.taxa.{taxonId}.title=
Ortholog mapping
There is an ortholog mapping file that is included with the application and will automatically populate the database on startup. The ortholog mappings are based on DIOPT.
The default value points to a classpath resource included within RDP archive:
rdp.settings.cache.ortholog-file=classpath:cache/DIOPT_filtered_data_May2021.gz
It would also be possible to use another ortholog resource, as long as it has the same format. For example, to use the NCBI gene orthologs:
rdp.settings.cache.orthologs-file=ftp://ftp.ncbi.nlm.nih.gov/gene/DATA/gene_orthologs.gz
If you change the source, you should also adjust the text that appears in the user documentation in
your messages.properties file.
rdp.cache.ortholog-source-description=The ortholog mapping is based on <a href="https://www.flyrnai.org/cgi-bin/DRSC_orthologs_v09.pl" target="_blank" rel="noopener">DIOPT version 9</a> \
results, filtered for score >5, either best forward or reverse match and Rank = "high" or Rank = "moderate".
As with other remotely downloaded files, this would be updated monthly.
Privacy levels
Privacy levels can be selectively enabled for user profiles and genes.
rdp.settings.privacy.enabled-levels=PUBLIC,SHARED,PRIVATE
rdp.settings.privacy.enabled-gene-levels=PUBLIC,SHARED,PRIVATE
Note that any value enabled for genes that is not also enabled for profiles will be ignored.
To allow user to modify the privacy level of their profile and individual genes, set the following properties:
rdp.settings.privacy.customizable-level=true
rdp.settings.privacy.customizable-gene-level=true
To disable gene-level privacy, set rdp.settings.privacy.customizable-gene-level
to false and leave the rdp.settings.privacy.enabled-gene-levels blank.
Profile categories
Researcher position
Researcher positions can be enabled or disabled by setting the
rdp.settings.profile.enabled-researcher-positions to a list of desired values.
For the moment, only one value is defined PRINCIPAL_INVESTIGATOR.
rdp.settings.profile.enabled-researcher-positions=PRINCIPAL_INVESTIGATOR
To disable this feature, just leave the setting blank.
Researcher categories
Researcher categories can be enabled or disabled by setting the
rdp.settings.profile.enabled-researcher-categories to a list of desired values.
rdp.settings.profile.enabled-researcher-categories=IN_SILICO,IN_VIVO
The available values are:
IN_VIVOIN_VITRO_BIOCHEMICALIN_VITRO_CELLSIN_VITRO_STRUCTURALIN_SILICOOTHER
To disable this feature, just leave the setting blank.
Human organ systems
Note
As of 1.5.0, we recommend that you use an additional profile category to add Human organ systems to the user profile.
The Human organ systems ontology is based on Uberon multi-species anatomy ontology and updated monthly.
rdp.settings.cache.organ-file=http://purl.obolibrary.org/obo/uberon.obo
Only a select few organ systems are active by default. You can activate more by running the following SQL command with an Uberon identifier of your choice:
update organ_info
set active = true
where uberon_id = '<uberon_id>';
If you activate a non-default organ system, consider adding an icon for it by following the instructions in the Style and static resources section below.
To enable human organ systems, set the following in your configuration:
rdp.settings.organs.enabled=true
Additional profile categories
Support for additional profile categories, including ontologies based on the OBO format, was introduced in the 1.5 series as a way to make the software more flexible and customizable.
Most of the administration of profile categories can be done under the /admin/ontologies endpoint, i.e. Manage Profile
Categories page.
To disable this feature altogether, set the following in your application.properties:
rdp.settings.ontologies.enabled=false
Create a simple category
On the Manage Profile Categories page, you may create a simple category. You must provide a name and at most 20 terms. Each term should have a unique name.
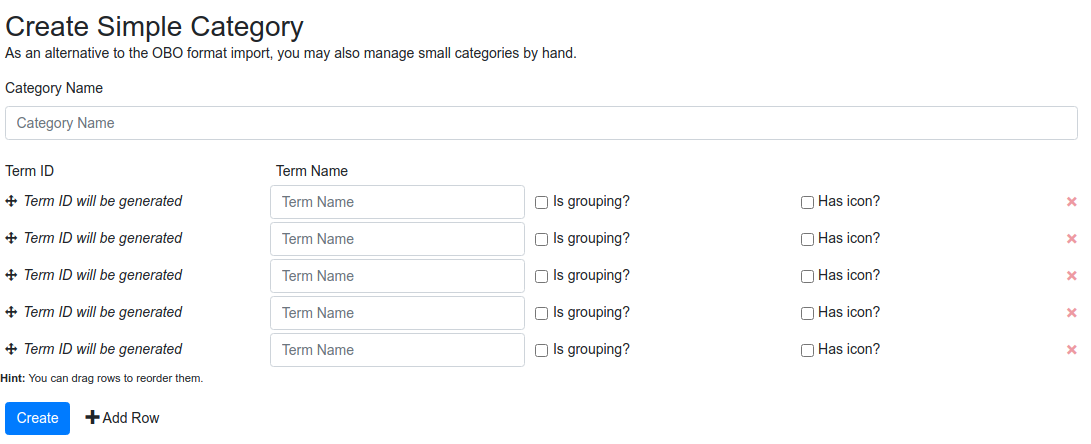
The terms can be organized in groups using grouping terms ("is grouping?"). Simple categories support only one grouping level. Terms are grouped under the closest preceding grouping term. Groups must not be empty. Grouping terms will not be used for searching the registry.
If no grouping is used, terms are displayed in a linear fashion.
A term can also be associated with an icon. If a category has a mixture of terms with and without icons, those without will use a SVG textual icon fallback.
![]()
Custom icons
To use custom icons, you must first enable custom style and static resources by expanding
the search path for static assets. Then, icons can be deposited
under static/images/ontologies/{ontologyName}/{termName}.svg.
Only SVG is supported at this time.
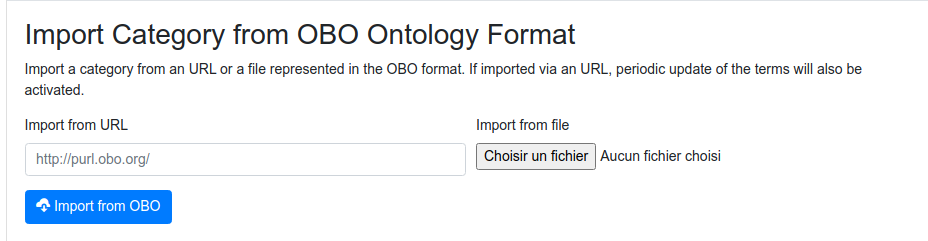
Create an ontology category
More complex categories are created using ontologies. The ontologies need to be in an OBO format. There are two ways of importing an ontology: using an URL or a file.
Once imported, you can either activate all ontology terms or a subset of terms by activating a subtree. Note that obsolete terms are never activated automatically.
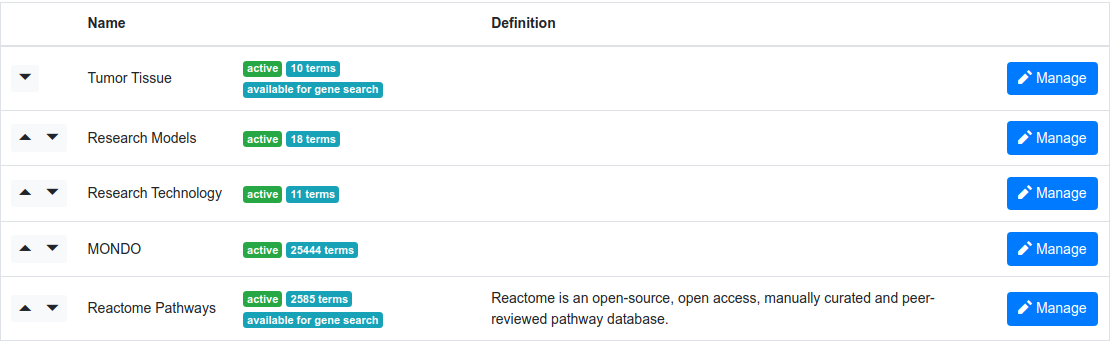
Managing profile categories
Once created, a new profile category will be listed in the table at the bottom of the Manage Profile Categories page. The table uses badges to display if the category is active or not, the number of active terms and if the category is used as a filter for Gene Search.
The order of categories, as they are displayed on the Profile and Search pages, can be modified using the arrows next to the category name.
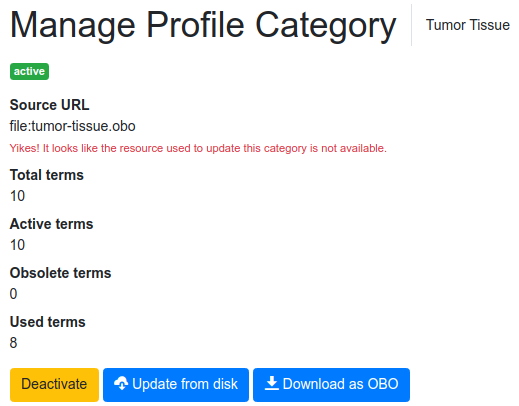
Managing a specific profile category
A specific profile category can be managed on its Manage Profile Category page, which is accessed by clicking on the "Manage" button in the table shown above.
The page lists some basic stats at the very top and provides few action buttons:
-
"Deactivate" (or "Deactivate All Terms" in the case of an ontology category): this will remove the category from the Profile and Search pages. This action is reversible, as the category can be easily re-activated. This action is recommended in cases where a category cannot be deleted because it has already been used by some users.
-
Update from "source": Update the ontology category using the original URL (if available)
-
Download as OBO: Download the category as an OBO file
The number of used terms indicate how many terms in the ontology have been associated with associated with users.
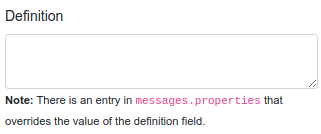
In the Edit window on the Manage Profile Category page, you can add a definition/description of the category, which is used in a tooltip on the Profile Page. You can also specify if this category will be used as a filter on the Gene Search page. While all active categories will be available on the Researcher Search page, only categories that have " Available for gene search?" checked will be displayed on the Gene Search page.
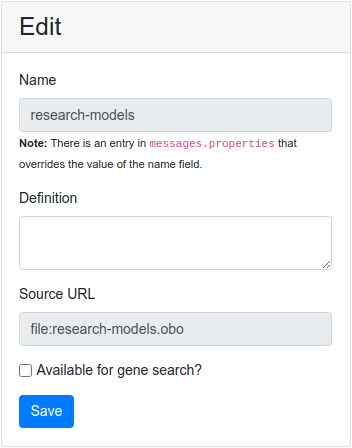
The name and source URL are not modifiable from the admin section, but can be edited directly in the database if needed.
Activating a subtree
Ontologies often contain a large number of terms and some of these terms might not be relevant to the users of your registry. You can chose which parts of an ontology will be used in the registry by activating specific subtrees. Subtrees can be activated once the ontology is imported, but can also be activated or deactivated later using the Manage Profile Category pages.
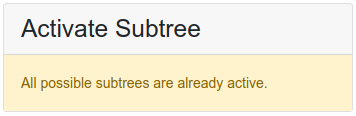
To activate a subtree, enter its root term (or use autocomplete) in the Activate Subtree window.
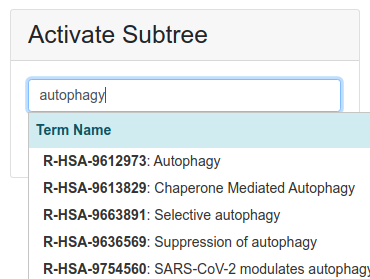
If all possible subtrees are already active, a warning will be displayed instead.
Once activated, the term will then appear in the list of active subtrees:

You may deactivate subtree from the table of active subtrees by clicking on "Deactivate".
The active subtrees get a special treatment when the ontology is updated to ensure that newly added sub-terms are always active.
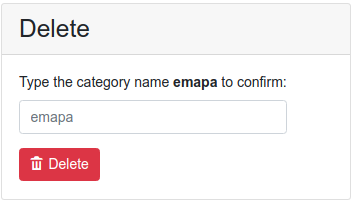
Deleting a category
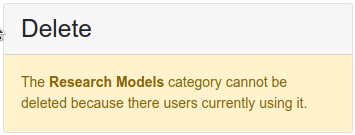
Deleting a category is irreversible and is only possible if it is not being used (there are no users that are associated with any of the category terms). If your ontology is being used, consider deactivating it instead.
If an ontology has at least one user, the following message will be displayed instead:
Custom titles and definitions
The content of messages.properties has precedence over the values stored in the database for titles and definitions of
categories and terms. This allows you to override values that are imported from an OBO source as you see fit.
rdp.ontologies.{ontologyName}.title=
rdp.ontologies.{ontologyName}.definition=
rdp.ontologies.{ontologyName}.terms.{termName}.title=
rdp.ontologies.{ontologyName}.terms.{termName}.definition=
If your ontology/category is based on a PURL source, its name will be rendered un uppercase. For example, "uberon" from http://purl.obolibrary.org/obo/uberon.obo will be displayed as "UBERON". You may override this by setting a custom title as described above.
Note that we provide defaults for Reactome in the JAR package, so you must use custom messages for overriding those values. A warning will be displayed in the admin section if this is the case.
Read more about configuring messages in Customizing the application messages section of this page.
Resolving external URLs
By default, ontologies and terms are resolved from OLS. Reactome pathways get a
special treatment with the ReactomeResolver. You may override this for a different resolver such
as Ontobee.
rdp.settings.ontology.default-resolver=ubc.pavlab.rdp.ontology.resolvers.OntobeeResolver
If you want to use a different source, you can provide a custom implementation of the OntologyResolver interface or
ask us by opening an issue on the RDP GitHub repository.
Reactome Pathways
Reactome Pathways are treated in a slightly different way when it comes to loading and updating terms.
Under /admin/ontologies, you can import the Reactome Pathways category with a single click. The initial import will
download pathways and update term definitions.

The Reactome Pathways category has two additional actions for updating its terms and definitions.

By default, Reactome Pathways use reactome as ontology name. This can be adjusted by
setting rdp.settings.ontologies.reactome-ontology-name in your configuration.
The various Reactome-related configuration should be left largely untouched. You can use static files by downloading
them and changing the URL scheme to file:.
rdp.settings.ontology.reactome-pathways-file=file:ReactomePathways.txt
rdp.settings.ontology.reactome-pathways-hierarchy-file=file:ReactomePathwaysRelation.txt
rdp.settings.ontology.reactome-stable-identifiers-file=file:reactome_stable_ids.txt
Reactome Pathways are updated at the same frequency as ontology terms. The update is performed in two stages: first the pathways are updated and then definitions are retrieved from the Reactome Content Service API.
Loading data from disk
It's also possible to store all the above mentioned info locally, instead of fetching it remotely. The following settings will retrieve all the necessary files relative to the working directory of the Web application:
#this setting relates only to gene info files. Files for all taxons will be stord under gene/
rdp.settings.cache.load-from-disk=true
rdp.settings.cache.gene-files-location=file:genes/
#file for GO ontology
rdp.settings.cache.term-file=file:go.obo
#file for gene GO annotation
rdp.settings.cache.annotation-file=file:gene2go.gz
#file for Uberon anatomy ontology
rdp.settings.cache.organ-file=file:uberon.obo
#location of the provided ortholog file which is stored locally by default
rdp.settings.cache.ortholog-file=file:DIOPT_filtered_data_March2020.txt
With rdp.settings.load-from-disk enabled, the basename from the gene_url (mentioned above) will be used in
conjunction with rdp.settings.gene-files-location. For example Homo sapiens taxon would be retrieved
from genes/Homo_sapiens.gene_info.gz
International data
In order to access the RDMM shared data system (via the international search), your application must use HTTPS. If you do not have HTTPS setup for you domain, you can consult the following guides on how to set it up:
- medium.com/@raupach/how-to-install-lets-encrypt-with-tomcat-3db8a469e3d2
- community.letsencrypt.org/t/configuring-lets-encrypt-with-tomcat-6-x-and-7-x/32416
Registries can access each other public data by enabling rdp.settings.isearch.enabled and setting up
the rdp.settings.isearch.apis in the application.properties file to contain a comma-delimited list of partner
registry URLs.
rdp.settings.isearch.enabled=true
rdp.settings.isearch.apis=https://register.rare-diseases-catalyst-network.ca/
A secure communication between different instances is achieved using a special search token which gets appended to remote queries. Currently, there is one token that is used by all partner registries.
The token can be generated using OpenSSL: openssl rand -base64 24 and it would look something like
this: hrol3Y4z2OE0ayK227i8oHTLDjPtRfb4 (this is just an example). Once generated, this token is shared securely with
partner registries.
The token is added to the application.properties file in the following way:
rdp.settings.isearch.search-token=hrol3Y4z2OE0ayK227i8oHTLDjPtRfb4
On the receiving side, the partner registry must create a user that is used to perform privileged searches.
This is usually done by creating a remote administrative account:
insert into user (email, enabled, password, privacy_level, description, last_name, name, shared, hide_genelist,
                  contact_email_verified)
values (concat(rand(), '@rdmm.com'), 0, md5(rand()), 0, 'remote admin profile', '', '', false, false, false);
insert into user_role (user_id, role_id)
values ((select max(user_id) from user), 1);
insert into user_role (user_id, role_id)
values ((select max(user_id) from user), 2);
select max(user_id)
from user;
Let's assume that the created user's ID was 522. The partner would then add the token to
its rdp.settings.isearch.auth-tokens setting along any existing tokens.
rdp.settings.isearch.user-id=522
rdp.settings.isearch.auth-tokens=jLb22QZzsaT6/w3xwDHBObmZPypJgXfb,hrol3Y4z2OE0ayK227i8oHTLDjPtRfb4
This allows you to query private data from the partner registry when logged in as an administrator on your own registry.
Out of network partners
To share data with partners outside the RDMM network that may use a different search token or no token at all, you may
use either the auth or noauth query parameter in the rdp.settings.isearch.apis configuration.
To deal with non-admin partners, specify the noauth query parameter, which will prevent leakage of the remote search
token from administrative accounts.
rdp.settings.isearch.apis=https://register.rare-diseases-catalyst-network.ca?noauth
If a partner uses a different search token, you may use the auth query parameter to specify that token.
rdp.settings.isearch.apis=https://register.rare-diseases-catalyst-network.ca?auth=jLb22QZzsaT6/w3xwDHBObmZPypJgXfb
Anonymized search results
By default, search results that are not accessible to a given user are anonymized. All identifiable information is stripped from the model and numerical identifiers are randomized in such a way that it becomes impossible to relate users or genes from different search.
This feature can be disabled by setting the following configuration key to false:
rdp.settings.privacy.enable-anonymized-search-results=false
Customizing the application's messages
Some text displayed in RDP can be customized and/or internationalized. To do so, copy a provided messages.properties
file in the working directory of the Web application and edit it. The file is found in
messages.properties
You can use suffixed like messages_en_CA.properties for region-specific customization.
Note that application-prod.properties and login.properties are also used for messages for backward compatibility.
New and existing messages should be moved to messages.properties.
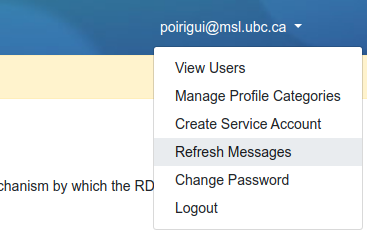
With an administrator account, you can refresh messages from the main menu without restarting the registry.
FAQ
The FAQs can also be customized in a similar way by editing the provided faq.properties file and setting up
the rdp.settings.faq-file parameter:
rdp.settings.faq-file=file:faq.properties
In the file, each entry requires two parts: rdp.faq.questions.<q_key> and rdp.faq.answers.<q_key> which hold the
question and the corresponding answer, respectively.
rdp.faq.keys=<q_key>
rdp.faq.questions.<q_key>=A relevant question.
rdp.faq.answers.<q_key>=A plausible answer.
The provided default file can be found in faq.properties.
Ordering FAQ entries
Note
New in 1.5.4
he rdp.faq.keys FAQ setting can be used to customize the ordering and appearance of FAQ entries. If the setting is
left unset, the default will be to arrange FAQ questions in alphabetic order of their keys.
Translating FAQ entries
Note
New in 1.5.4
The FAQ messages can now be translated by reusing the rdp.faq.questions.<q_key> and rdp.faq.answers.<q_key> as codes
for the messages.properties file.
Terms of service and privacy policy
The terms of service and privacy policy can be added to the messages.properties by editing the following entries:
rdp.terms-of-service=Your terms of service
rdp.privacy-policy=Your privacy policy
Theme color
To use a custom theme color, set the following property in your configuration:
rdp.site.theme-color=#ffffff
The theme color is used to recolor certain browsers and provide a more unified user experience.
Style and static resources
Static resources can be selectively replaced by including a search directory for Spring static resources.
spring.resources.static-locations=file:static/,classpath:/static/
Here's the list of paths that can be adjusted using the above setting:
static/
    images/
        organs/
            <uberon_id>.svg
        researcher-categories/
            <researcher_category_id>.svg
        ontologies/
            {ontologyName}/
                {termName}.svg
        brand.png
        favicon-16x16.png
        favicon-32x32.png
        header.jpg
To customize static CSS and JavaScript assets, you have to build from sources.
Building from source
You can customize RDP by editing the publicly available source code and packaging the JAR archive yourself.
To build from sources, you will need a working version of Node.js installed as well as a Java 8+ JDK.
git clone https://github.com/PavlidisLab/rdp.git
cd rdp/
# edit what you want...
./mvnw package
The new build will be available in the target directory.
Editing assets
CSS and JavaScript assets are bundled with Webpack. You may edit the files found
under src/main/resources/css and src/main/resources/js and then issue a ./mvnw package command to rebuild the JAR
archive.
Alternatively, you can run npm directly:
cd src/main/resources
npm run build # or 'watch' to build continuously